 Javascript
Conway’s Game of life – LWC
I’ve seen many implementations of this Algorithm or “Game” in almost any language or platform out there. I have not seen yet, someone implementing this on Salesforce LWC. I’m pretty sure someone might have tried that before me, But I thought to myself.. “Self..maybe you should write one and see what you can learn from this…”
While this won’t have much business logic baked into it, like most of the stuff we typically build in Salesforce, it definitely shows a few interesting Javascript techniques and has helped me grasp more of an understanding in how to deal with 2 dimensional Grids (Array of arrays) and pick up some html5 canvas drawings skills along the way.
It shouldn’t be too different than any other JavaScript implementation, but it does always makes me happy when I manage to translate something from the open web and make it work inside my day to day platform or stack and in same time it really satisfy me, when I can simplify a complex concept into words or in this case a game.
In addition, I’ve recently heard that John Horton Conway, the inventor of this amazing algorithm, has recently passed away from COVID-19, so I thought this can be a nice tribute for him as well.
In the 1970’s, he explored or even helped create the field of Cellular automaton. In short, this is where scientists were literally observing a grid of cells in any finite number of dimensions.
- For each cell, There is a set of cells called its neighbourhood — Those are the cells surrounding a certain cell.
- Time starts when the Grid is set to a certain initial state – Zero or One on each cell.
- Then, we can observe the evolution of the grid, certain cells and/or their neighbourhoods.
The “Rules of life” will determine the next generation state for each cell – Alive or Dead / Zero or One.
This concept resembles and even illustrates the rise and fall of any living organisms or society based on population.
Evolution is determined by its initial state…
Quite deep. But the Game of Life logic can have infinite implementation and implications.
It runs on this basic, but quite a clever algorithm or if you wish, a “Set of Rules”:
- Any live cell with fewer than two live neighbours dies, as if by underpopulation.
- Any live cell with two or three live neighbours lives on to the next generation.
- Any live cell with more than three live neighbours dies, as if by overpopulation.
- Any dead cell with exactly three live neighbours becomes a live cell, as if by reproduction.
Basically when implementing those rules in an infinite loop over a 2 dimensional array – Some shapes literally get a “Life” of their own..
Many different types of patterns were discovered that can occur in the Game of Life. They even gave them names :
- still life : do not change between generations.

- oscillators : which returns to their initial state after a few generations.

- spaceships : translate themselves across the grid.

Theoretically, the Game of Life has the power of a universal Turing machine – anything that can be computed algorithmically can be computed within the Game of Life.
I was quite intrigued by this concept…
But enough background stories, everything you need or want to learn more about, a quick google search will lead your path to many more genius discoveries.
Let’s get cracking and try to build this algorithm in LWC and see this thing in action.
Find here the full playground code for this project.
But if you wish to see the breakdown step by step — keep on reading.
Step 1 : Create the Universe
Our first step here, would be to render a 2 dimensional data array that holds the initial state of our “universe”.
- We can set the number of the
columnsandrowsas parameters for our grid dimensions. - We will set the
heightandwidthof the cell dynamically based on component screen size – just because, I like responsive things 🙂
Our initial state will be a random number of Zero or One for each Cell in the grid.
- Zero represents a “Dead” cell. One will be our “Alive” cell.
- We can also, set colour inputs for each state.
- I’ll skip the html parts in this post that shows the color and button inputs — but feel free to look in the actual example code for those.
We will use html5 canvas to draw our grid. I will be able to draw pretty easily on it and animate it. Plus… I wanted to play with canvas for quite some time so this can be a good use case.
Canvas Element on the HTML
<template>
   <div class="board-container">
      <canvas class="board-canvas"></canvas>
   </div>
</template>
A bit of CSS just to set the initial size of our canvas container — the rest will be handled in our JS file.
.board-container {
    height:500px;
}
.board-canvas {
    width:100%;
    height:100%;
    border:5px solid black;
}
Our Initial JS File — Create a Random World
import { LightningElement, track } from 'lwc';

const DEFAULT_SIZE = 3;
const DEFAULT_COLOUR = {
    ALIVE: '#bb202d',
    DEAD: '#ffffff'
}
export default class GameOfLife extends LightningElement {

    columns = DEFAULT_SIZE;
    rows = DEFAULT_SIZE;
    columnWidth = 1;
    rowHeight = 1;
    @track grid = [];
    aliveColor = DEFAULT_COLOUR.ALIVE;
    deadColor = DEFAULT_COLOUR.DEAD;

 rendered = false;
 renderedCallback() {
     if (!this.rendered) {
           this.createWorld();
           this.rendered = true;
        }
  }
  createWorld() {
     // Set Initial Random 2D Array
     const universe = this.generateGrid(this.columns, this.rows, true);
     // console.table(universe);
     // Paint the initial Grid
     this.grid = this.renderGrid(universe);
  }

  // 2D Array generator with random toggle
  generateGrid(cols, rows, random = false) {
       // Cell initial state Zero Or One
       return new Array(cols).fill(null)
              .map(() => new Array(rows).fill(0)
                 .map(() => random ? Math.floor(Math.random() * 2) : 0));
      }
  }
- When our component has rendered —
renderedCallbackwill be fired. This is where we will have access to our DOM elements. We need it, in order to get our canvas context and draw on it. - We only want to call it once after render.
- We also need it, so we can set the width and height dynamically based on the DOM container size.
Cool trick for debugging — If we wish to evaluate our grid values generations :
- Un-comment the
console.table(universe)log statement and check in your browser console — we can actually display our grid quickly this way and check our values.
Step by step methods inside our JS code – Render the grid on the canvas.
- Getting the canvas
contextas parameter allows us to re-use and reset our context when we need. clientWidth/clientHeight— will provide us the component current dimensions and will allow us to set the cell width and height dynamically.- Iteration over the
columnsand X axis androwsas Y axis - Setting each
widthandheight - Setting the colour based on the given state value. (Alive/Dead colours)
// Sets the height and width
// Clear context
// Drawing the grid on canvas

renderGrid(grid) {
    this.context = this.getCanvasContext();
    // Sets width and Height
    this.columnWidth = this.context.width / this.columns;
    this.rowHeight = this.context.height / this.rows;

    let universe = grid;
    for (let i = 0; i < this.columns; i++) {
        for (let j = 0; j < this.rows; j++) {
            this.renderCell(universe[i][j], i * this.columnWidth, j * this.rowHeight, this.columnWidth, this.rowHeight );
        }
    }
    return universe;
}

// Init Canvas
getCanvasContext() {
    const canvas = this.template.querySelector('canvas');
    // setting the canvas to container size
    canvas.width = canvas.clientWidth;
    canvas.height = canvas.clientHeight;
    const ctx = canvas.getContext("2d");
        ctx.width = canvas.clientWidth;
        ctx.height = canvas.clientHeight;
    // Clear canvas
    ctx.clearRect(0, 0, ctx.width, ctx.height);
    return ctx;
}

// Drawing
renderCell(state, x, y, width, height) {
    this.context.beginPath();
    this.context.fillStyle = state === 1 ? this.aliveColor : this.deadColor;
    this.context.clearRect(x,y, width, height);
    this.context.rect(x, y, width, height);
    this.context.stroke();
    this.context.fill();
}
- I’ve separated those methods so we can re-use them for the different functionality later on and tried to keep it readable.
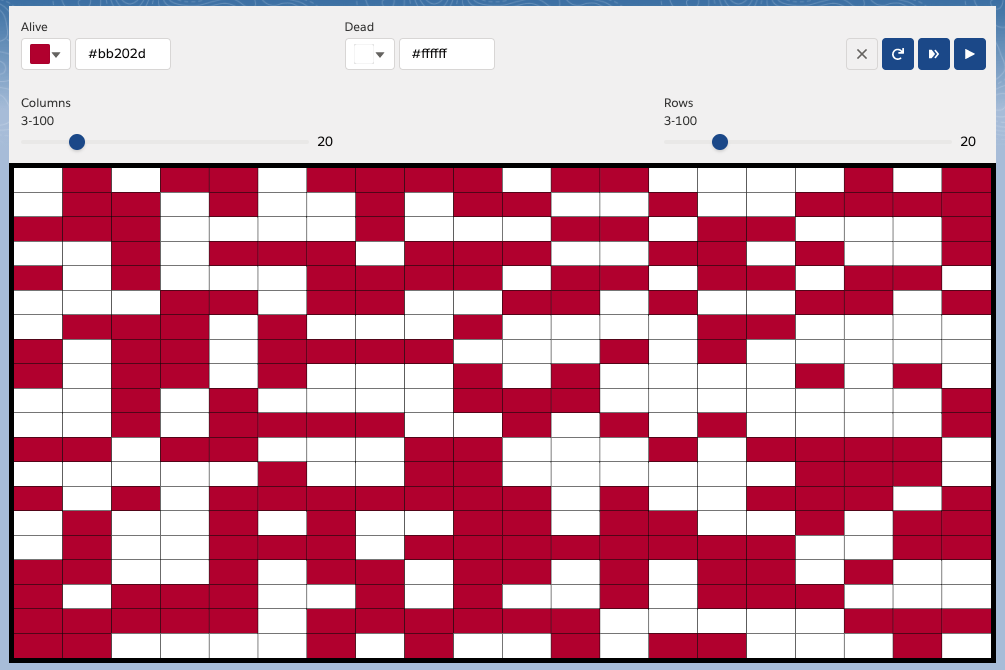
Let’s test where we are on the UI… It should give us an initial dynamic scaled state canvas based on those columns and rows .

Voila! The grid holds a 2 dimensional array with random values of 0 or 1 as the cells state that are also painted with our set of colours.
Step 2 : Creating the World’s next Generations
- This is where we first need to identify the Neighbourhoods for each cell, then count all living cells.
- Secondly, implement the Rules of life and Generate the Next Generation of the
grid.
So, based on the current state of each cell and how many neighbours are alive, we can define the new state of each cell and assign it into the Next Generation grid.
- The below
nextGenerationmethod will be broken down into steps. - It will allow us to both
countNeighboursand set the new state for each cell based on therulesOfLife.
// Calculate the next generation grid
  nextGeneration() {
      let nextUniverse = this.grid;
      let cells = [];
      const lastColumn = this.columns - 1, lastRow = this.rows - 1;

      for (let col = 0; col < this.columns; col++) {
          for (let row = 0; row < this.rows; row++) {
              let state = nextUniverse[col][row];
              // check cell neighbours
              const totalNeighbours = this.countNeighbours(nextUniverse, col, row, lastColumn, lastRow);
              state = this.runRulesOfLife(state, totalNeighbours);

              // Assign the new Generation Cells
              cells.push({
                  state: state,
                  col: col,
                  row: row,
                  x: col * this.columnWidth,
                  y: row * this.rowHeight,
                  neighbours: totalNeighbours
              });

          }
      }
      // Drawing after calculated new state for each cell
      cells.forEach(cell => {
              // Sets the new state in grid
              nextUniverse[cell.col][cell.row] = cell.state;
              // Draw the cells
              this.renderCell(cell.state, cell.x, cell.y, this.columnWidth, this.rowHeight);
      });

      // set the next generation grid
      this.grid = nextUniverse;
  }
countNeighbours method will sum up the values in each neighbourhood.
Respectively it will also implement the Edges and Corners rules which we will discuss a bit further below.
 // Edges should be handle differently as they won't have 8 cells serrounding them
 // Grid Corners will have 3 neighbours only
 // Rows and Columns Edges will have only 5 neighbours
 // All Other cells will have 8 neighbours
 // Iterate between -1 to 2 will allow to go to each neighbour cell from all sides

countNeighbours(grid, currentColumn, currentRow, lastColumn, lastRow) {

     // Getting iterators positions relative to this current column and row
     const { xStart, xEnd, yStart, yEnd } = this.getNeighbourhoodCells(currentColumn, currentRow, lastColumn, lastRow);

     // Build our neighbourhood array
     let neighbourhood = [];
     for (let i = xStart; i < xEnd; i++) {
         for (let j = yStart; j < yEnd; j++) {
             // Skip the current cell
             if (i === 0 && j === 0) {
                 continue;
             }

             // Shift the grid column and row based on our iterator
             neighbourhood.push(grid[i + currentColumn][j + currentRow]);
         }
     }
     // Sum all neighbourhood values in the array
     return neighbourhood.reduce((a, b) => a + b, 0);
}
This is a good point to stop for a second and understand, how can we identify the neighbourhood of a given cell ?
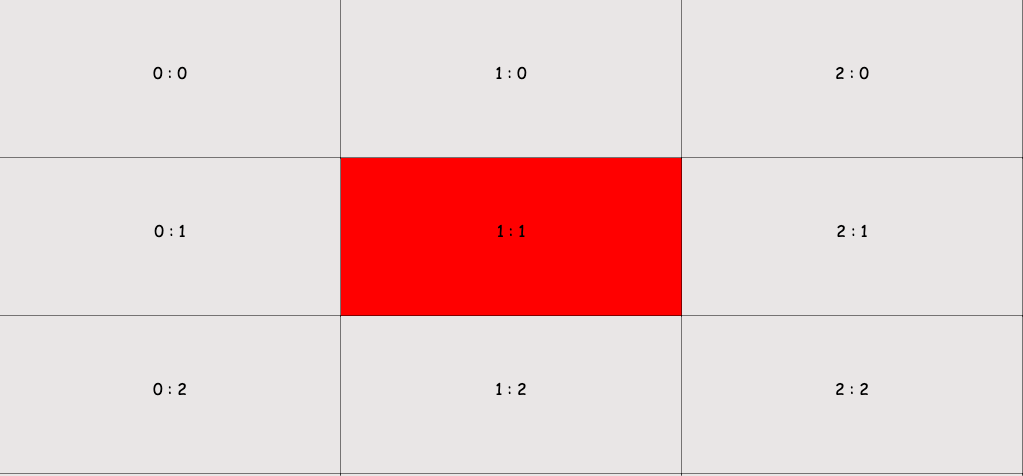
When checking for neighbours we basically need to run on the surrounding “neighbourhood” of the cells as an array by itself.
-
We are iterating over
columnsand then again overrows— 2 nested iterations.In the above case, We can shift one column to the left and one to right, same goes for top to bottom on the rows.
This will give us the neighbours of the middle cell (Red).
We can build another iteration here to cover this with this setting :
- xStart : indexStart, // -1
- xEnd : indexEnd, // 2
- yStart :indexStart, // -1
- yEnd : indexEnd // 2
Our
columnsrepresent our X axis androwsrepresent our Y axis. By running between -1 up to 1 in each iteration, we are covering the cells to the :- Top Left, Left, Bottom Left => Column 0, Rows 0 up 2.
- Top, Bottom => Column 1, Only Row 0 and 2
- Top Right, Right, Bottom Right => Column 2, Rows 0 up 2.
- We need to skip the middle cell : 1 : 1 => that’s the one we are evaluating.
I must admit that when I started developing this thing, I didn’t fully realise, what kind of a complex “mind ** procedure” it is, when you keep iterating over those
columnsandrowsand trying to understand how to calculate those in your brain.Did you get this headache already ? Which cell are we iterating now ? go left then right ah ?? It helps to visualise this as much as possible.
Handling the Grid Edges and Corners
When using for example a 3X3 grid (like above) we can see a different size of a neighbourhood when it comes to any cell, BUT the middle Red cell.
- For the algorithm to work — we basically need 8 cells as a neighbourhood.
- So we can either just ignore any other case and only handle the cells that has 8 neighbours.
- This will leave the edges and corners in their initial state.
But, I’ve seen a few ways of handling the edges and corners, which can also give us dynamic edges.
The problem here is that :
- Corners — will have only 3 neighbours.
- Edges — will have only 5 neighbours.
In those cases, we can extend the array with Dead Zero cells , Or maybe simpler to say, Only count the available cells for each case.
- This seems to be more interesting and will also make the entire grid dynamic.
So I’ve built this getNeighbourhoodCells method to handle the iteration for each neighbourhood relative to its position on the grid.
- It seems a bit long… but hey you kept on reading this far 🙂
- For each corner or edge — it will run relatively on the available cells
- Otherwise it will give us the 8 neighbours scenario as default.
// Will handle all Corners, Edges and Other Cells in Grid to find the neighbours of the the current examined cell
getNeighbourhoodCells(col, row, lastColumn, lastRow) {
    const indexStart = -1, indexEnd = 2;

    // TOP LEFT CORNER - 3 neighbours
    if (col === 0 && row === 0) {
        return {
            xStart: col,
            xEnd: indexEnd, // 2
            yStart: row,
            yEnd: indexEnd // 2
        }
    }
    // BOTTOM LEFT CORNER - 3 neighbours
    else if (col === 0 && row === lastRow) {
        return {
            xStart : col, // 0
            xEnd : indexEnd, // 2
            yStart : indexStart, // -1
            yEnd : indexEnd + indexStart // 1
        }
    }
    // TOP RIGHT CORNER - 3 neighbours
    else if (row === 0 && col === lastColumn) {
        return {
            xStart : indexStart, // -1;
            xEnd : indexEnd + indexStart, // 1
            yStart : row, // 0,
            yEnd : indexEnd, // 2
        }
    }
    // BOTTOM RIGHT CORNER - 3 neighbours
    else if (col === lastColumn && row === lastRow) {
        return {
            xStart: indexStart, // -1;
            xEnd: indexEnd + indexStart, // 1
            yStart: indexStart,//  -1;
            yEnd: indexEnd + indexStart // 1
        }
    }
    // TOP ROW EDGE - 5 neighbours
    else if (row === 0 && col > 0 && col < lastColumn) {
        return {
            xStart: indexStart, // -1,
            xEnd :indexEnd, // 2,
            yStart : row, // 0,
            yEnd : indexEnd // 2
        }
    }
    // BOTTOM ROW EDGE - 5 neighbours
    else if (row === lastRow && col > 0 && col < lastColumn) {
        return {
            xStart: indexStart, // -1,
            xEnd: indexEnd, // 2,
            yStart: indexStart, // -1,
            yEnd: indexEnd + indexStart // 1,
        }
    }
    // RIGHT COLUMN EDGE - 5 neighbours
    else if (col === lastColumn && row > 0 && row < lastRow) {
        return {
            xStart : indexStart, // -1,
            xEnd : indexEnd + indexStart, // 1,
            yStart : indexStart, // -1,
            yEnd : indexEnd // 2,
        }
    }
    // LEFT COLUMN EDGE - 5 neighbours
    else if (col === 0 && row > 0 && row < lastRow) {
        return {
            xStart : col, // 0,
            xEnd : indexEnd,// 2,
            yStart : indexStart, // -1,
            yEnd : indexEnd //2,
        }
    }
    // ALL OTHERS CELLS - 8 neighbours
    else {
        return {
            xStart : indexStart, // -1,
            xEnd : indexEnd, // 2,
            yStart :indexStart, //  -1,
            yEnd : indexEnd // 2,
        }
    }
}
Personally, Not a big fan of the many if/else if statements but I hope it makes it easy to read.
Once we have the total number of neighbours and we know the current cell state, we can finally run the Rules of life on this cell and calculate the next generation grid.
Run the Rules of Life
// **
// Any live cell with fewer than two live neighbours dies, as if by underpopulation.
// Any live cell with more than three live neighbours dies, as if by overpopulation.
// Any live cell with two or three live neighbours lives on to the next generation.
// Any dead cell with exactly three live neighbours becomes a live cell, as if by reproduction.
// **

runRulesOfLife(state, neigbours) {
    if (state === 1 && neigbours < 2 || neigbours > 3) {
        return 0;
    }
    else if (state === 1 && (neigbours === 2 || neigbours === 3)) {
      return 1;
    }
    else if (state === 0 && neigbours === 3) {
        return 1;
    }
    else {
        return 0;
    }
}
Step 3 : Lets Animate the Universe and see the future generations !
Now, this step is optional. We can just leave it with a next button that shows us the next Generation each click.
But, we have a few options to perform this kind of an infinite loop or animate the canvas.
- SetInterval — Will run in an infinite loop and allow you to control the speed in a pretty straight forward way.
this.speed = 500;
interval;

// activate the loop
onPlay() {
  this.interval = window.setInterval(() => {
      // Do Something
      this.nextGeneration();
  }, this.speed);
}

// Stop the infinite loop
onStop() {
  window.clearInterval(this.interval);
}
- window.requestAnimationFrame — This should be more efficient as it calls the next animation frame only once ready.
- But, to control the speed of the animation I had to do some math.
- This does not seem to work for me in the web components playground. But works great inside Salesforce.
// We must initialize the animate method in constructor
constructor() {
   super();
   this.animate = this.animate.bind(this);
}

onPlay() {
  // Run animation
  this.animate();
}

lastRenderTime = 0;
speed = 200; // milliseconds
animate(timestamp = 0) {
    // current LWC supported methods
    const requestAnimationFrame = window.requestAnimationFrame || window.webkitRequestAnimationFrame;
    this.interval = requestAnimationFrame(this.animate);
    // interval speed control
    const delta = (timestamp - this.lastRenderTime);
    if (delta < this.speed) {
        return;
    }
    this.lastRenderTime = timestamp;
    // Do Something
    this.nextGeneration();
}

onStop() {
    window.cancelAnimationFrame(this.interval);
    this.interval = false;
}
- Those are the currently supported window methods in LWC.
- Above code is how I have achieved it, though as always there are better and more optimised ways to code this challenge.
- Many wise people, have actually found ways and written complete theories on how to optimised this algorithm and shorten up the code to achieve it — I just tried to see if it would work and I that I can play with my example.
So from now on it’s mainly which UI buttons we wish to have in order to interact with the grid.
I’ve added some slds base input component to get the colour and sliders inputs along with some buttons on the html template — that’s easy.
But thats it.. Challenge accepted and completed successfully.
We are ready to observe our animated Game of life.
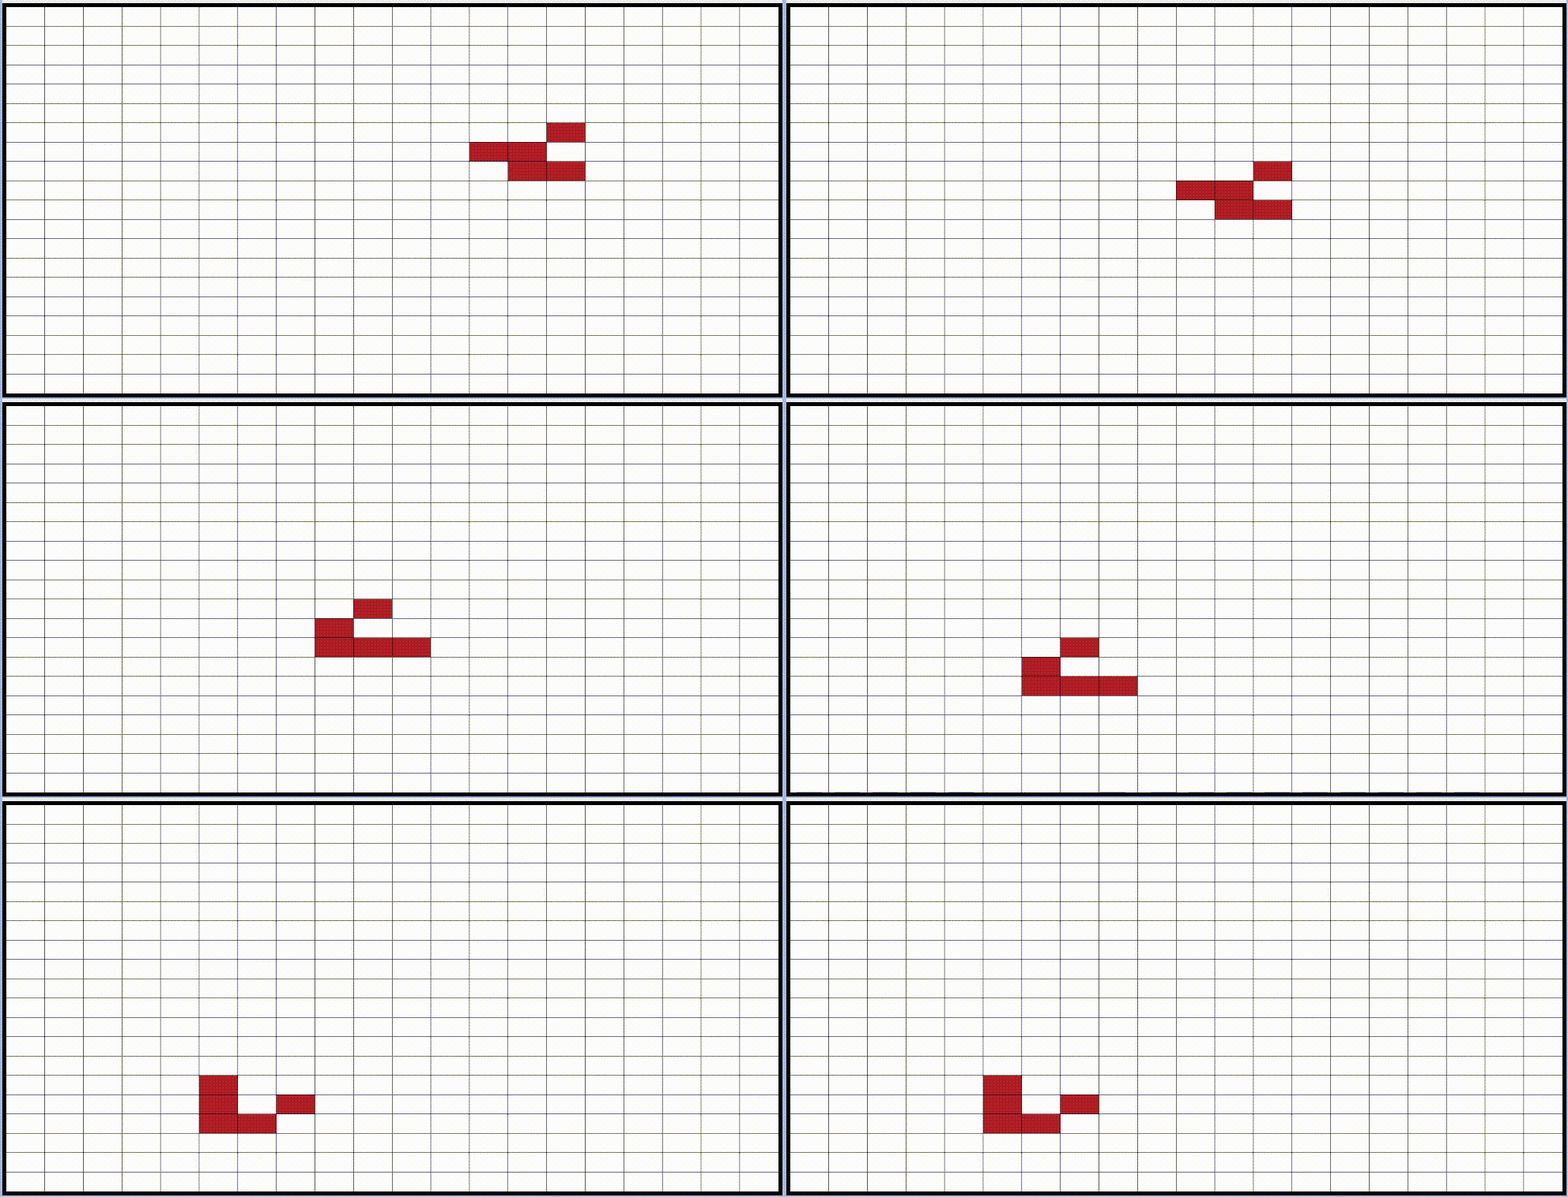
While its probably a complete useless app to have this inside a Salesforce Record Page, it might help pass some time for curious users in our org 🙂

Full Working example can be found here :
I went on to add some more functionality into this project to allow me to draw the different shapes as I please and examine their behaviour.
Feel free to fork it and extend it as you wish.
There are some pretty cool examples online for different implementation.
I’ve even heard about a Game of Life written in the Game of life.. Embedding audio and sounds and all sorts of crazy stuff.
I hope this article shows my small contribution to the community and my greatest appreciation to Conway’s Game of life. RIP John Conway.
Worth recognising and noting that he made much larger contributions to mankind other than just the “Game of life”, he in fact didn’t really like it! He thought it stole some attention from other great inventions. But for me, this is the something that just caught my eye and made me think. So thanks for that !
Hope you enjoyed reading… I enjoyed figuring this one out and sharing the story of a great man.
Resources:
