 Yeoman
Yeoman – Generate SFDX Project Workflow
This post will describe how to use a Yeoman generator for creating and setting up an SFDX project.
We covered the basics of Yeoman on the previous post :
![]() Yeoman – Getting Started with ‘Yo’ AutomationPrevious Article about Yeoman
Yeoman – Getting Started with ‘Yo’ AutomationPrevious Article about Yeoman
SFDX Project folder structure
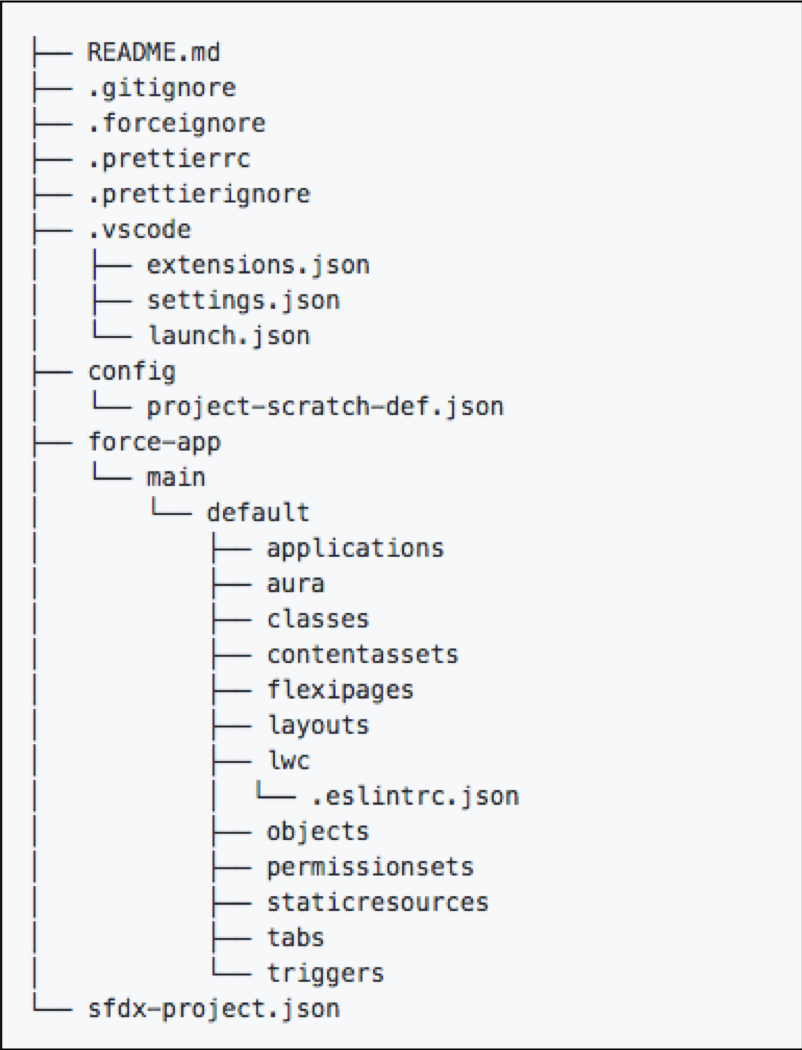
The basic structure contains the following :
- Documentation in README.md file.
- Source Code Settings such as what to ignore in the :
- .gitignore – ignore file from git
- .forceignore – ignore file from SFDX commands
- IDE Settings (VS Code)
- Configuration Folder :
- Scratch Org configuration file
- App Source Code Folder (force-app) :
- main > default > here you will find all metadata being tracked.
- sfdx-project.json
- manifest
More information in this Documentation link
Define the Generator Workflow
The Following workflow can be pretty useful to start your Project as a Developer:
- Create the Project using the SFDX command and use User questions inputs as command flag
- Open your VS Code Editor and Start Coding.
The SFDX Command to invoke using the Generator :
sfdx force:project:create
- -n : Project Name
- -p : Default Package Directory
- -s : Optional => Allow to add Namespace
- -t : Org Template => standard
- -x : –manifest => Include Manifest
Import some useful packages
Inside your Generator js file you may wish to import and reference some dependencies to help you run the SFDX commands and output some nicer graphics.
const Generator = require('yeoman-generator');
const chalk = require('chalk'); // will add some colors to input/output
const yosay = require('yosay'); // will add yeoman ascii image
const shell = require('shelljs'); // will run shell commands such as sfdx
const spinner = require('ora'); // will show a nice looking spinner when processing
Initialize your generator using the initializing() method
constructor(args, opts) {
   super(args, opts);
   //input params
   this.argument("projectName", { type: String, required: false });
   this.argument("skipIntro", { type: Boolean, required: false });
 }
// init the spinner module
 initializing() {
   this.loading = new spinner(
     { spinner:'monkey',
       color : 'yellow' }
   );
 }
Prompt Questions for populating the Flags
This Example will simply add them as Questions array to the yeoman prompting() method, it will prompt the Users to type the project Name etc and will scaffold the SFDX project.
prompting() {
 const projectQuestions = [
      {
        type: "input",
        name: "projectName",
        message: "Project Name ? "+ chalk.yellow(this.destinationPath() +"/ "),
        default:'MyProject',
        when: !this.options.projectName,
        validate: function(value) {
          return value ? true : 'Please enter a name';
        }
      },
      {
        type: "input",
        name: "appFolder",
        message: "App Folder Name ? ",
        default: 'force-app',
        validate: function(value) {
          return value ? true : 'Please enter a name';
        }
      },
      {
        type: "input",
        name: "appNamespace",
        message: "Namespace (optional)"
      },
      {
        type    : 'confirm',
        name    : 'includeReadMe',
        message : 'Include ReadMe file',
        default : true
      },
      {
        type: "editor",
        name: "appDescription",
        message: "Description (optional)",
        when: function(answers) {
          return answers.includeReadMe;
        }
      }
    ];

// adding the questions to a new merged array
const questions = [...projectQuestions];

// will store user inputs
this.props = {};// ask the questions and use the answers
return this.prompt(questions).then(answers => {
       this.props = answers;
       this.props.projectName = this.options.projectName ? this.options.projectName : answers.projectName;
});}
Running the SFDX Command and write config files
Once we stored the questions response inside a public variable this.props – we can use the answers to populate the project command template
writing() {
const answers = this.props;
//start loader spinner
this.loading.start('configuring sfdx command : ' + chalk.red(this.props.projectName) + '\n');
let sfdxCommand = ' sfdx force:project:create';
sfdxCommand += ' -n ' + answers.projectName;
sfdxCommand += ' -p ' + answers.appFolder;
if(answers.appNamespace) // Optional
sfdxCommand += ' -s ' + answers.appNamespace;
sfdxCommand += ' -t ' + 'standard'; // --template
if(answers.includeManifest)
sfdxCommand += ' -x ';
// log the full command to run
this.log(" Run ?? : "+ chalk.magenta(sfdxCommand) );
// execute shell command
shell.exec(sfdxCommand);
}
Using the writing() method will allow us to Scaffold some extra config files and place them in our project
- eg. create a readme.md template and have it ready when project is completed with all the basic things you wish to have on it.
// check if command has ran successfully
if( shell.exec(sfdxCommand).code === 0 ) {
 // check if user wish to create readme file
 if(this.props.includeReadMe){
    // will copy and write the file from template
    this.fs.copyTpl(
       this.templatePath('docs/README.md'),  // path location of my readme.md template
       this.destinationPath(this.props.projectName + '/readme.md'), // path destination
                    {
                      appPath: this.props.appFolder,
                      appName: this.props.projectName,
                      appDescription: this.props.appDescription
                    }
      );
 }

 // log success message and stop spinner
 this.loading.succeed(chalk.green('Created project successfully'));

 /******* OPTIOAL SETTINGS ********/
 // add computer voice to the mix to say 'completed'
 shell.exec(' say \' Your project was created! \'');

 // open vscode editor with the new project folder
 shell.exec(' code '+ answers.projectName);
}